HEALTHY CHOCOLATE MOUSSE BARS
Impossible to stop at one, these Healthy Chocolate Mousse Bars are the treat you didn’t know you needed!
Rich, indulgent, and secretly good for you, these no bake chocolate desserts are made with wholesome ingredients like nuts, dates, and tahini.
Looking for more delicious desserts? Try my Pistachio Chocolate Bar OR this Easy Chocolate Cake recipe!
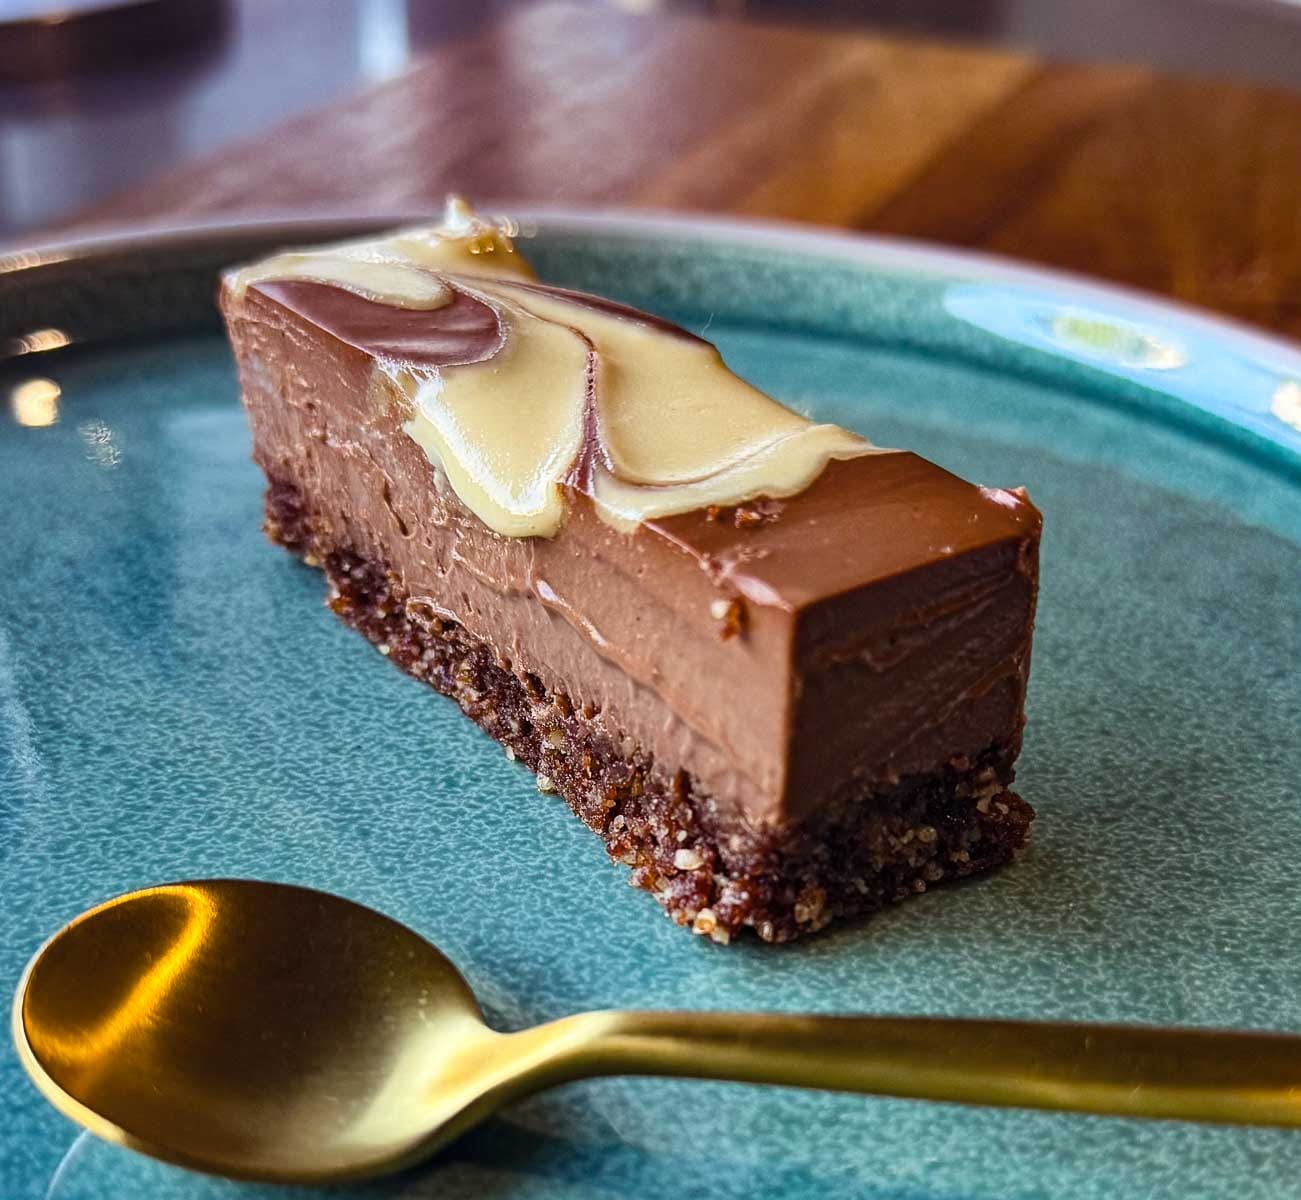
They also happen to be plant based mousse bars that are completely vegan, dairy-free, gluten-free, and refined sugar-free. Oh, and did I mention guilt-free?
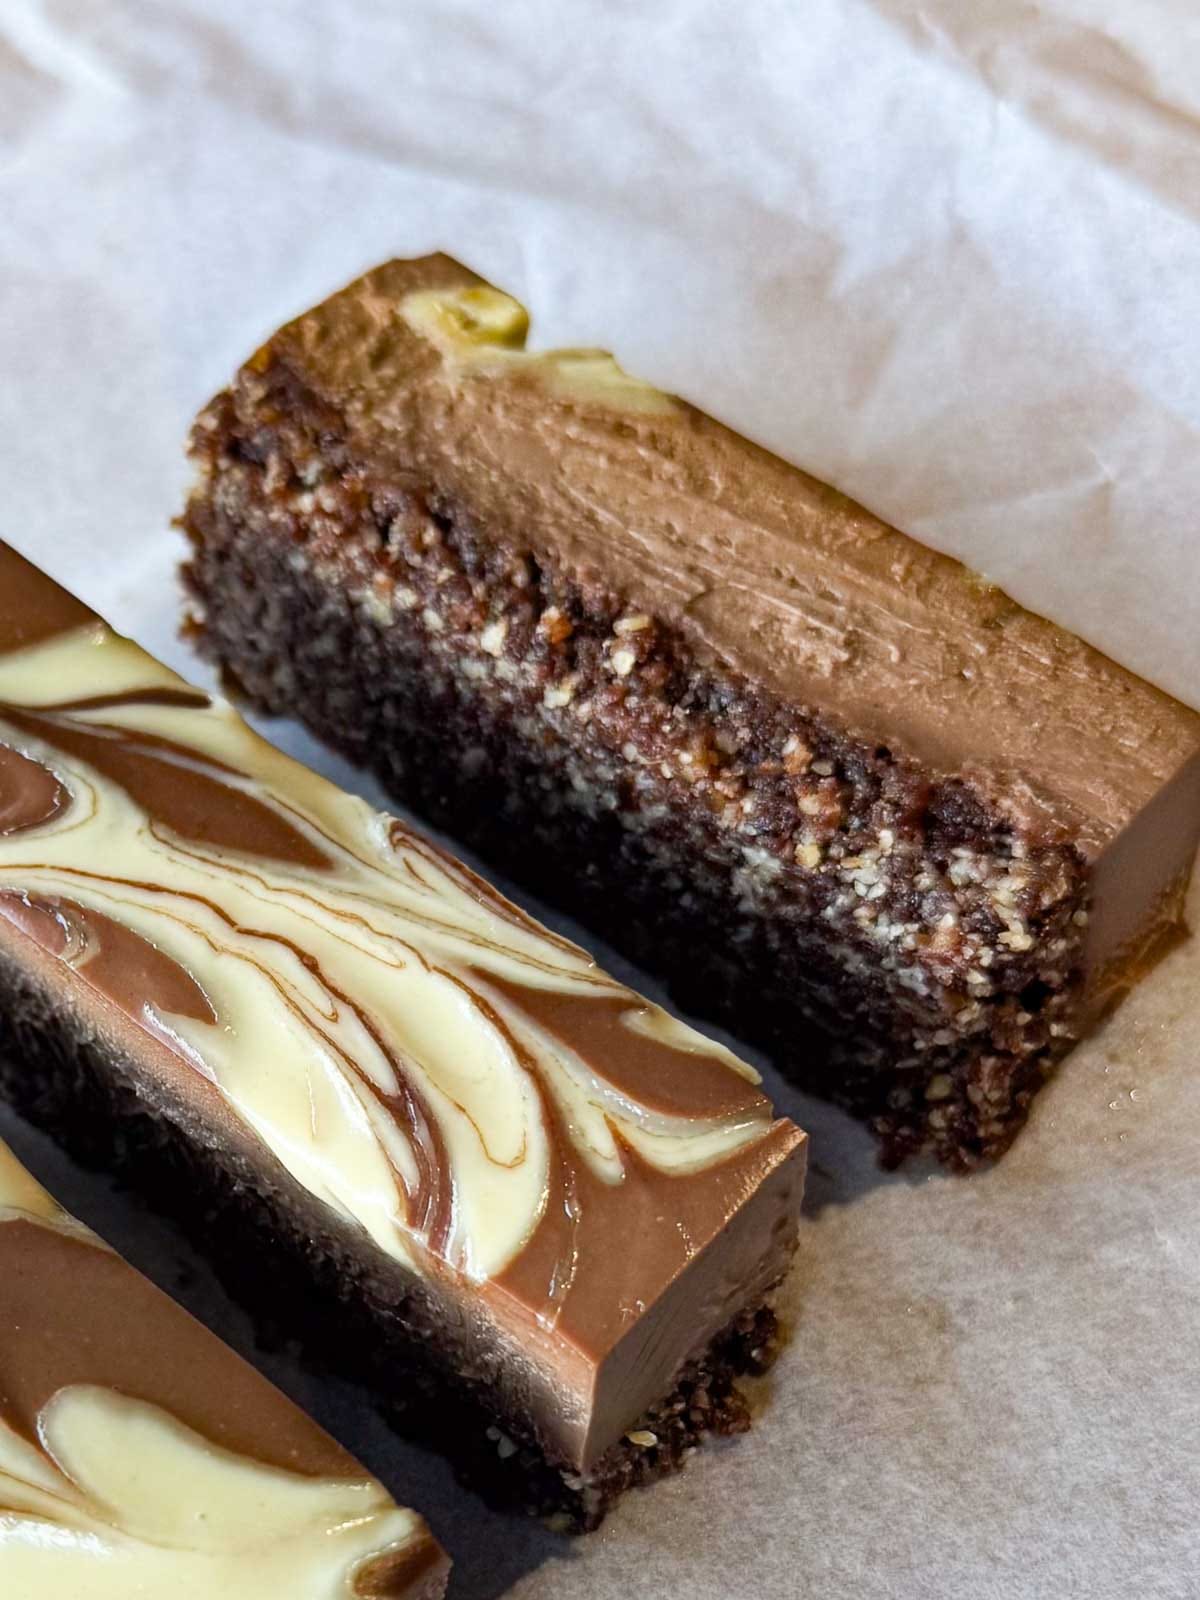
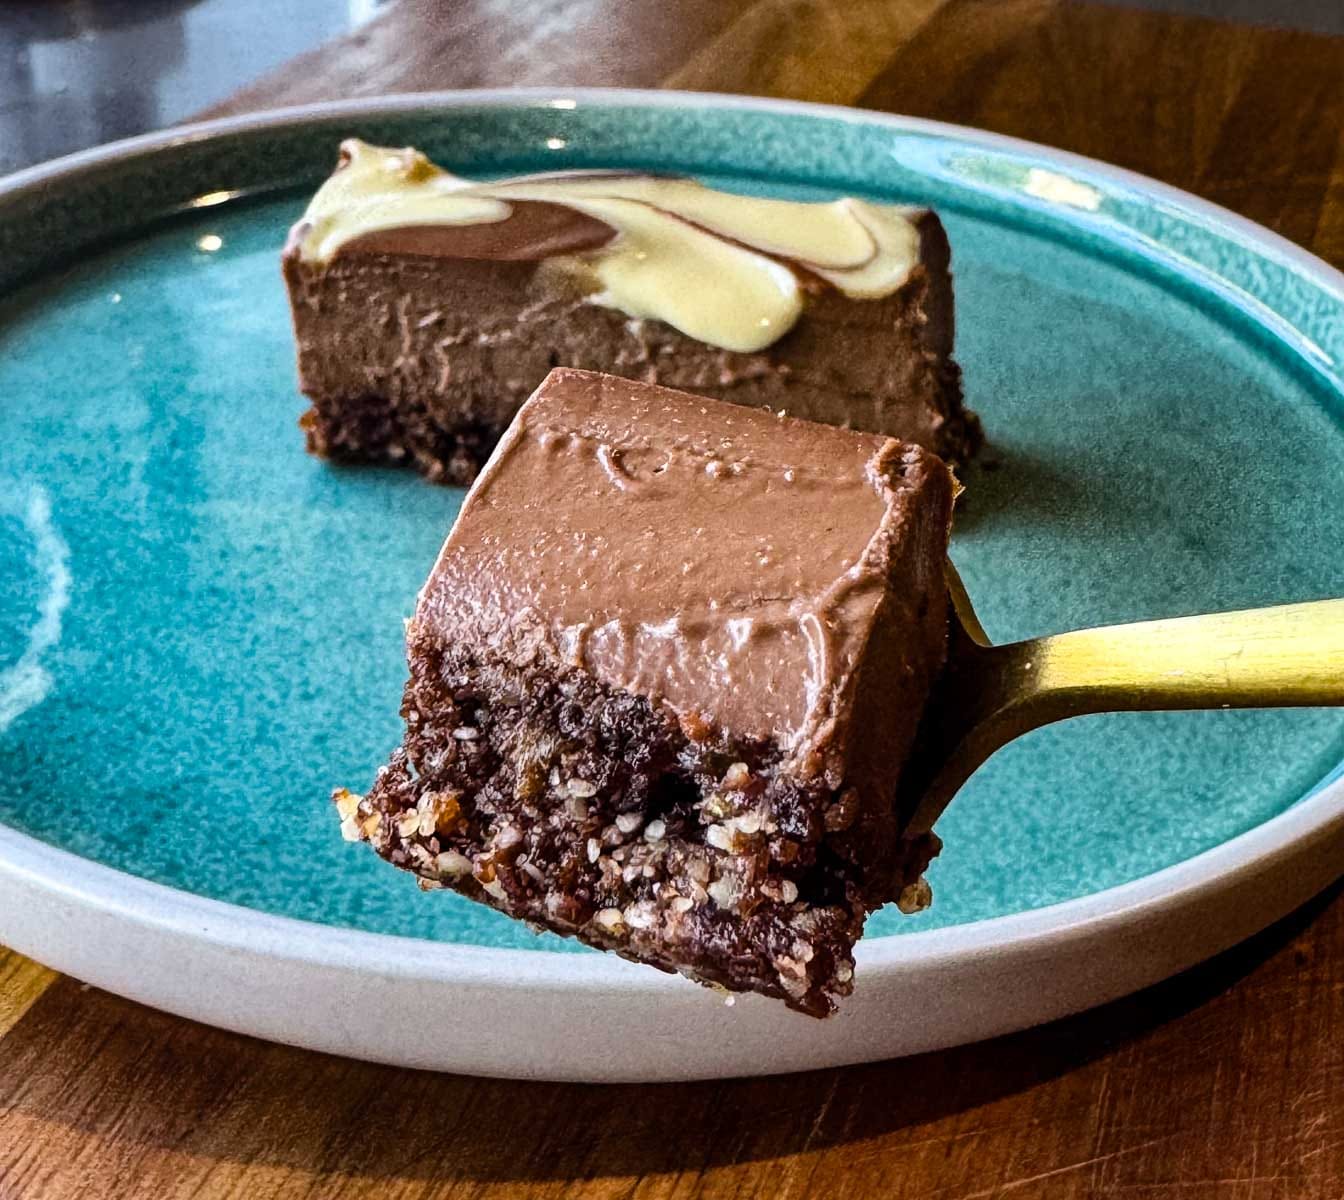
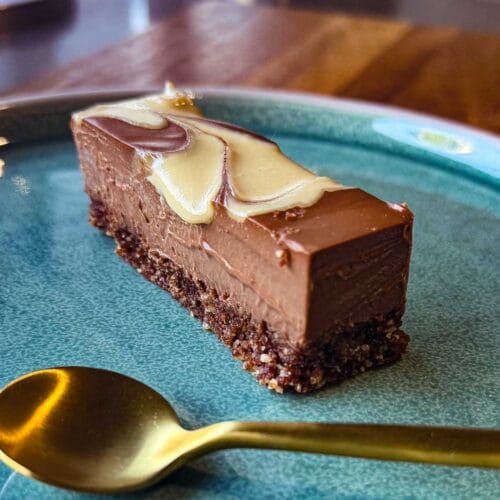
Wholesome yet indulgent Healthy Chocolate Mousse Bars!
The best of both worlds, ya know?
Incredibly easy to make – just blend the nutty base, melt and pour the mousse topping, then chill until set! That’s it! Let’s Make It!
WATCH HOW TO MAKE IT!
Recipe Ingredients
What you’ll need to make these delicious No Bake Healthy Chocolate Mousse Bars (all made with simple ingredients you probably already have on hand):
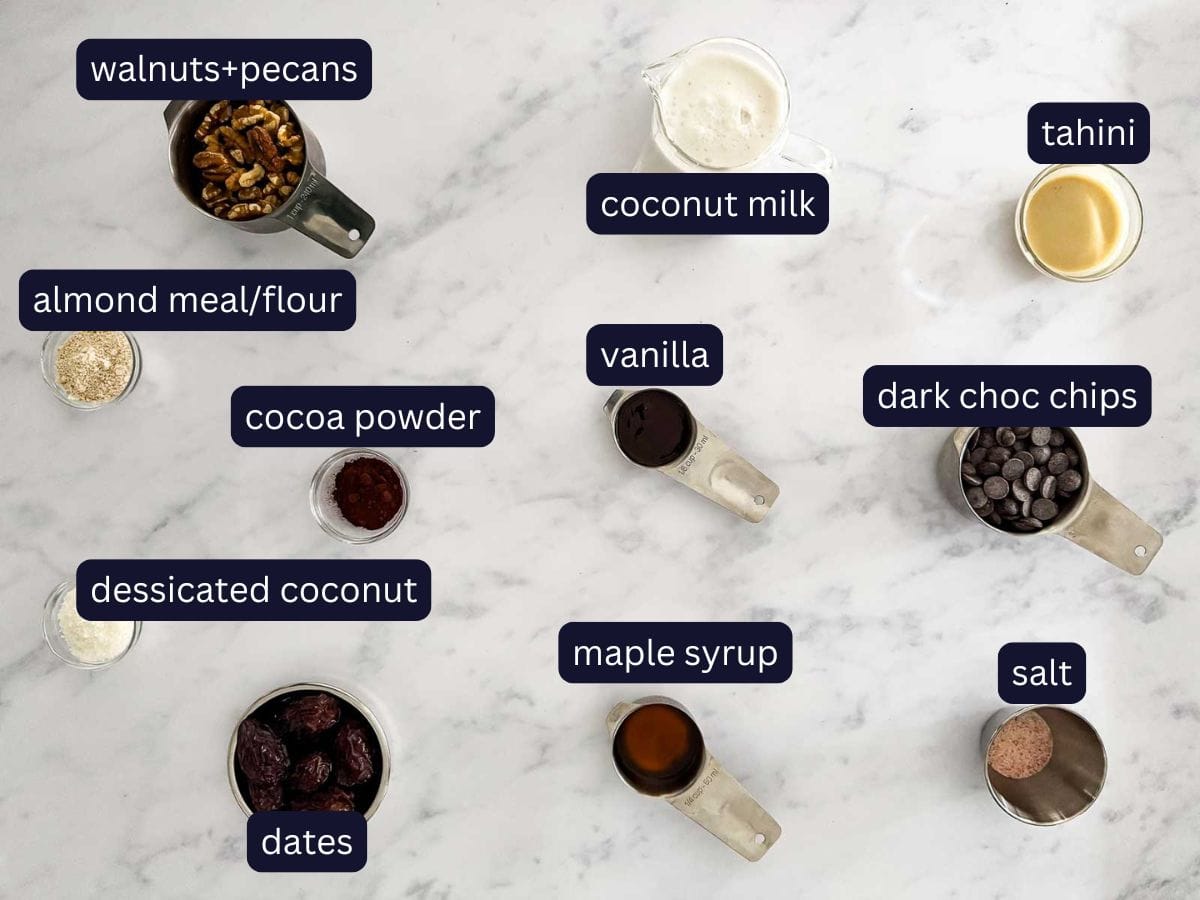
Ingredient Notes and Substitutions
These vegan dessert bars come together with pantry staples – each of the main ingredients plays a role in sweetness, texture and that smooth, creamy texture we all crave!
For the Nutty Base:
- For the nuts I like using a mix of walnuts and pecans. Walnuts add a deep, slightly bitter richness, while pecans bring a soft, buttery sweetness to balance it out. But don’t worry if you only have one, either one works just fine!
- Almond Meal/Flour helps bind the base and contributes to a soft, tender crumb;
- Desiccated Coconut adds texture and a hint of coconut flavor;
- Use a good quality unsweetened Cocoa Powder. It adds a nice chocolatey flavor. My go to brand is always Valrhona, however Rodelle is another great budget friendly option. Alternatively you could also use your favorite raw cacao;
- Medjool Dates are the best type, making them the ideal natural sweetener and sticky binder in this recipe. Be sure to use pitted or remove the pits!;
For the Vegan Chocolate Mousse Topping:
- Coconut Milk gives the mousse its smooth, creamy texture without any dairy. It sets beautifully, and my go-to brand is Kara. It works wonderfully in both sweet and savory recipes. If you’re after alternatives, you could try cashew cream, oat cream, or plant-based cooking cream. Almond or soy milk thickened slightly with cornflour may also work well. That said, I’ve only tested and made this recipe using coconut milk;
- Dark Chocolate Chips are the star of the show, giving the topping its deep, silky chocolate flavor. My all-time favorite is Callebaut 811 Dark Chocolate Callets, but feel free to use any good-quality dark chocolate/dark chocolate bar you like. If you need this to be 100% dairy-free and vegan, make sure your chocolate doesn’t contain milk. Many high-quality chips such as couverture callets or those with 70%+ cocoa are naturally dairy-free, but always check the label to be sure;
- Tahini aka Sesame Seed Paste is a must in this recipe! It adds creaminess, richness and a slight nuttiness that complements the chocolate flavor beautifully!;
- Maple Syrup Maple Syrup adds natural sweetness and depth. Use a good quality pure maple syrup (not imitation), and taste your mousse – add more if you prefer a sweeter mousse;
- Vanilla complements the chocolate flavor by adding a hint of warmth and depth. I love using a good quality Vanilla Bean Paste (I use the brand Queens here in Australia). Pure Vanilla Extract is perfect too! Avoid imitation!;
- A small pinch of Salt adds a necessary final touch, to balance the sweetness and intensify the chocolate mousse flavor!
How To Make HEALTHY CHOCOLATE MOUSSE BARS Step-By-Step:
Here are some quick visual instructions. The full instructions with the exact ingredients and process are printable in the recipe card below!
For the NUTTY BASE LAYER:
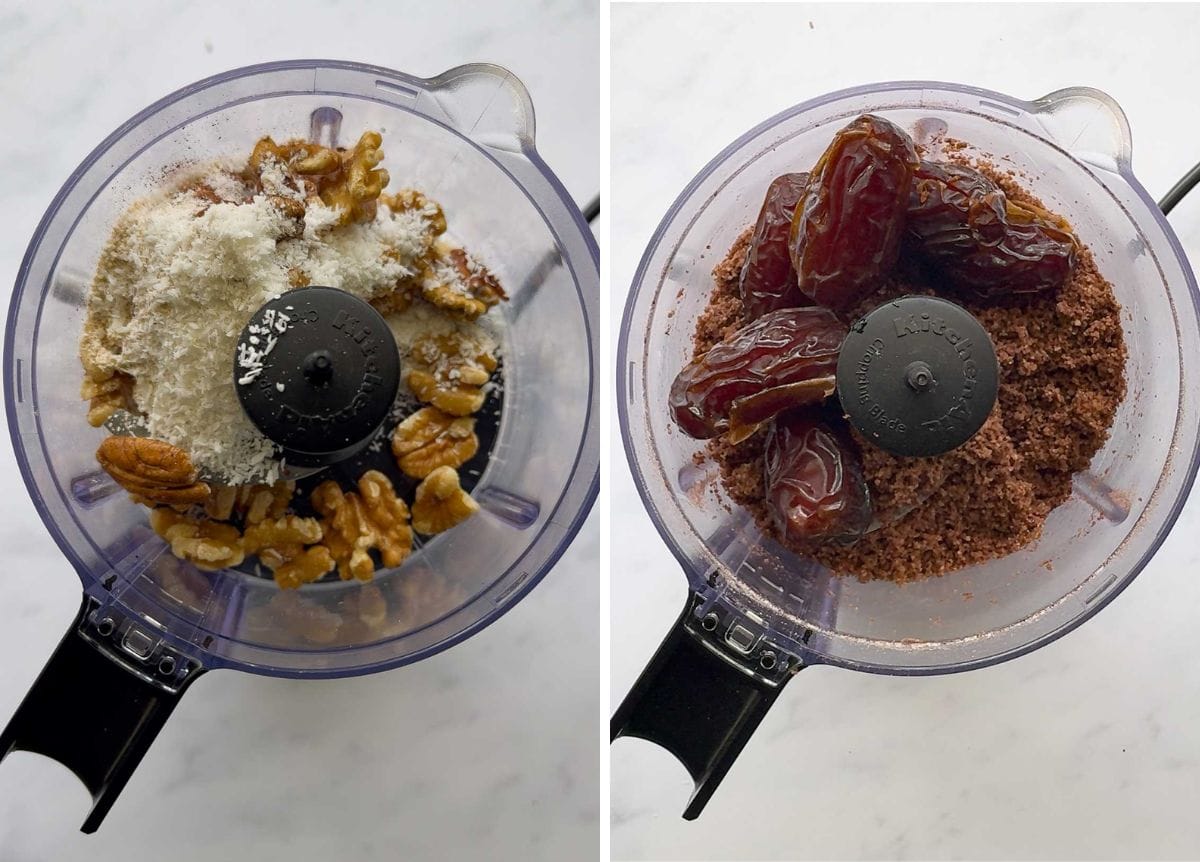
Step 1: Pulse walnuts, pecans, cocoa powder, almond flour, and desiccated coconut in a small food processor until coarse. Add dates last and pulse again.
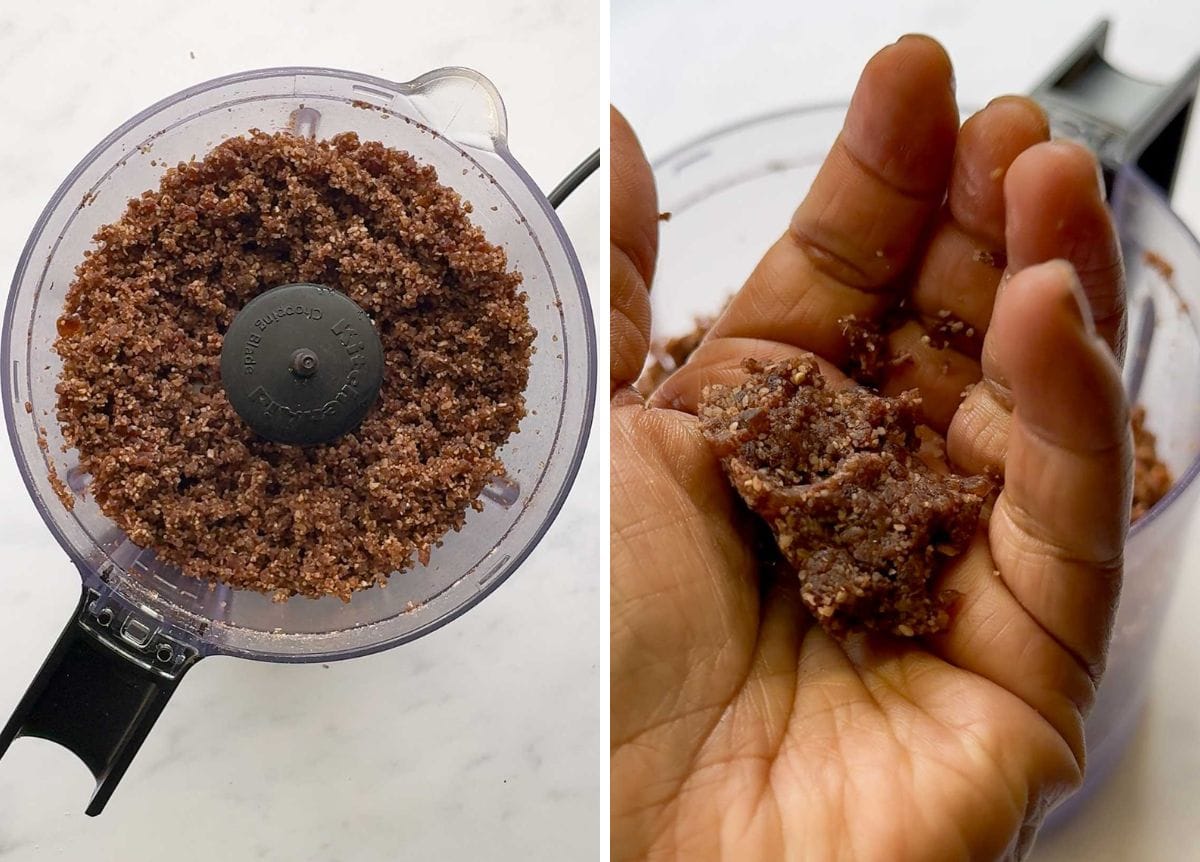
Step 2: Once the mixture is evenly combined and crumbly, squeeze a small handful – if it holds together, it’s ready!

Step 3: Line a 9″x5” loaf pan with parchment, leaving overhang for easy removal. Use binder clips to hold the paper in place if necessary. Transfer the nut mixture into the prepared pan and tightly pack into the base in an even layer. Since it’s no-bake, any pan or mould will work – just choose a similar size so the layers match in thickness and you get a similar set and slice.
For the PLANT BASED CHOCOLATE MOUSSE LAYER:
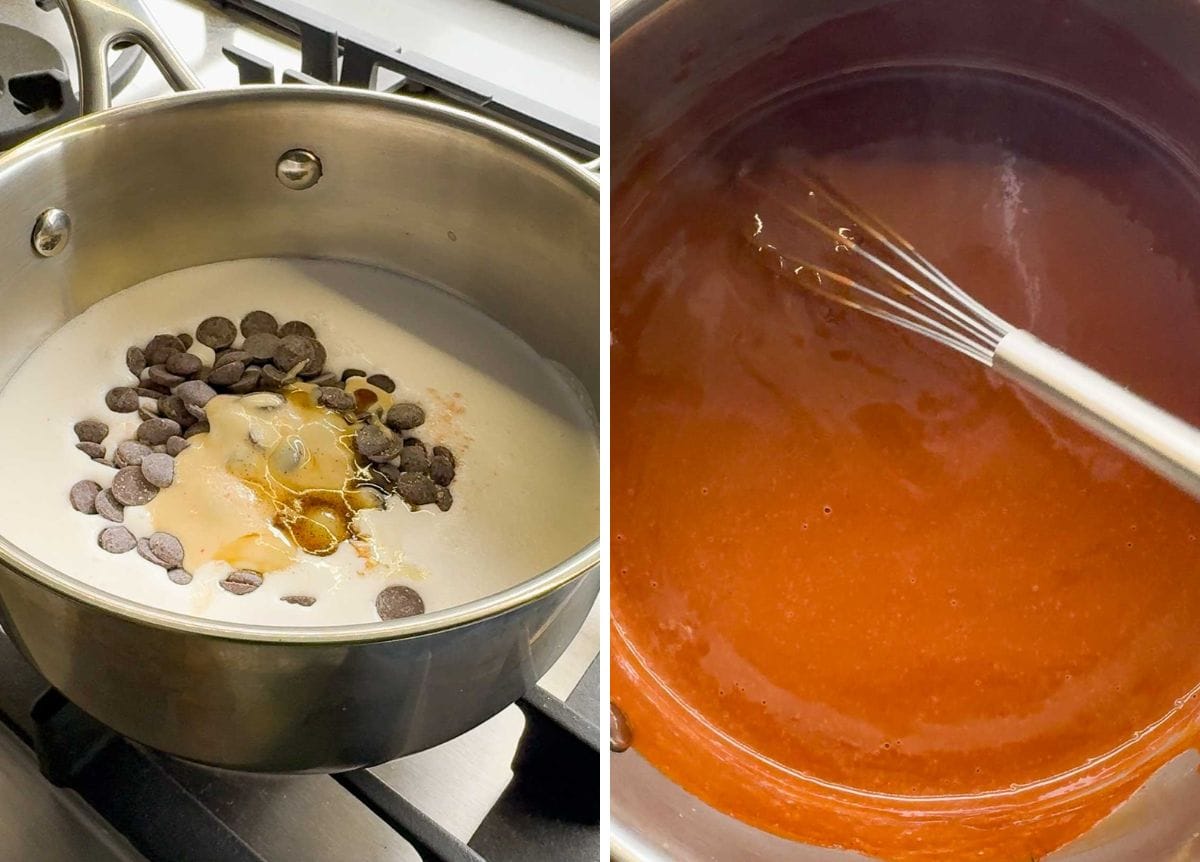
Step 4: In a small saucepan, combine coconut milk, chocolate chips, tahini, maple syrup, vanilla and a pinch of salt. Heat gently over low to medium heat, stirring continuously until everything is smooth and turns into a rich, melted chocolate mixture. Remove from heat and let cool slightly.
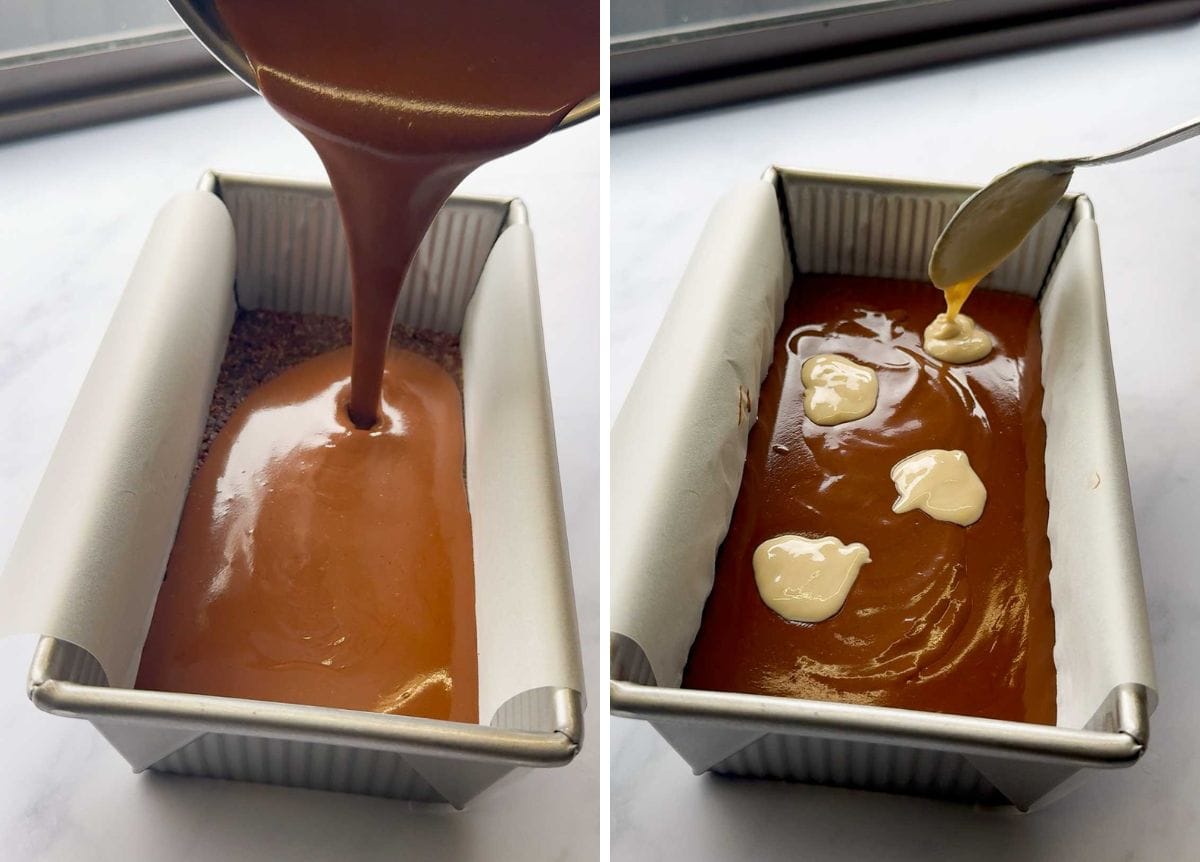
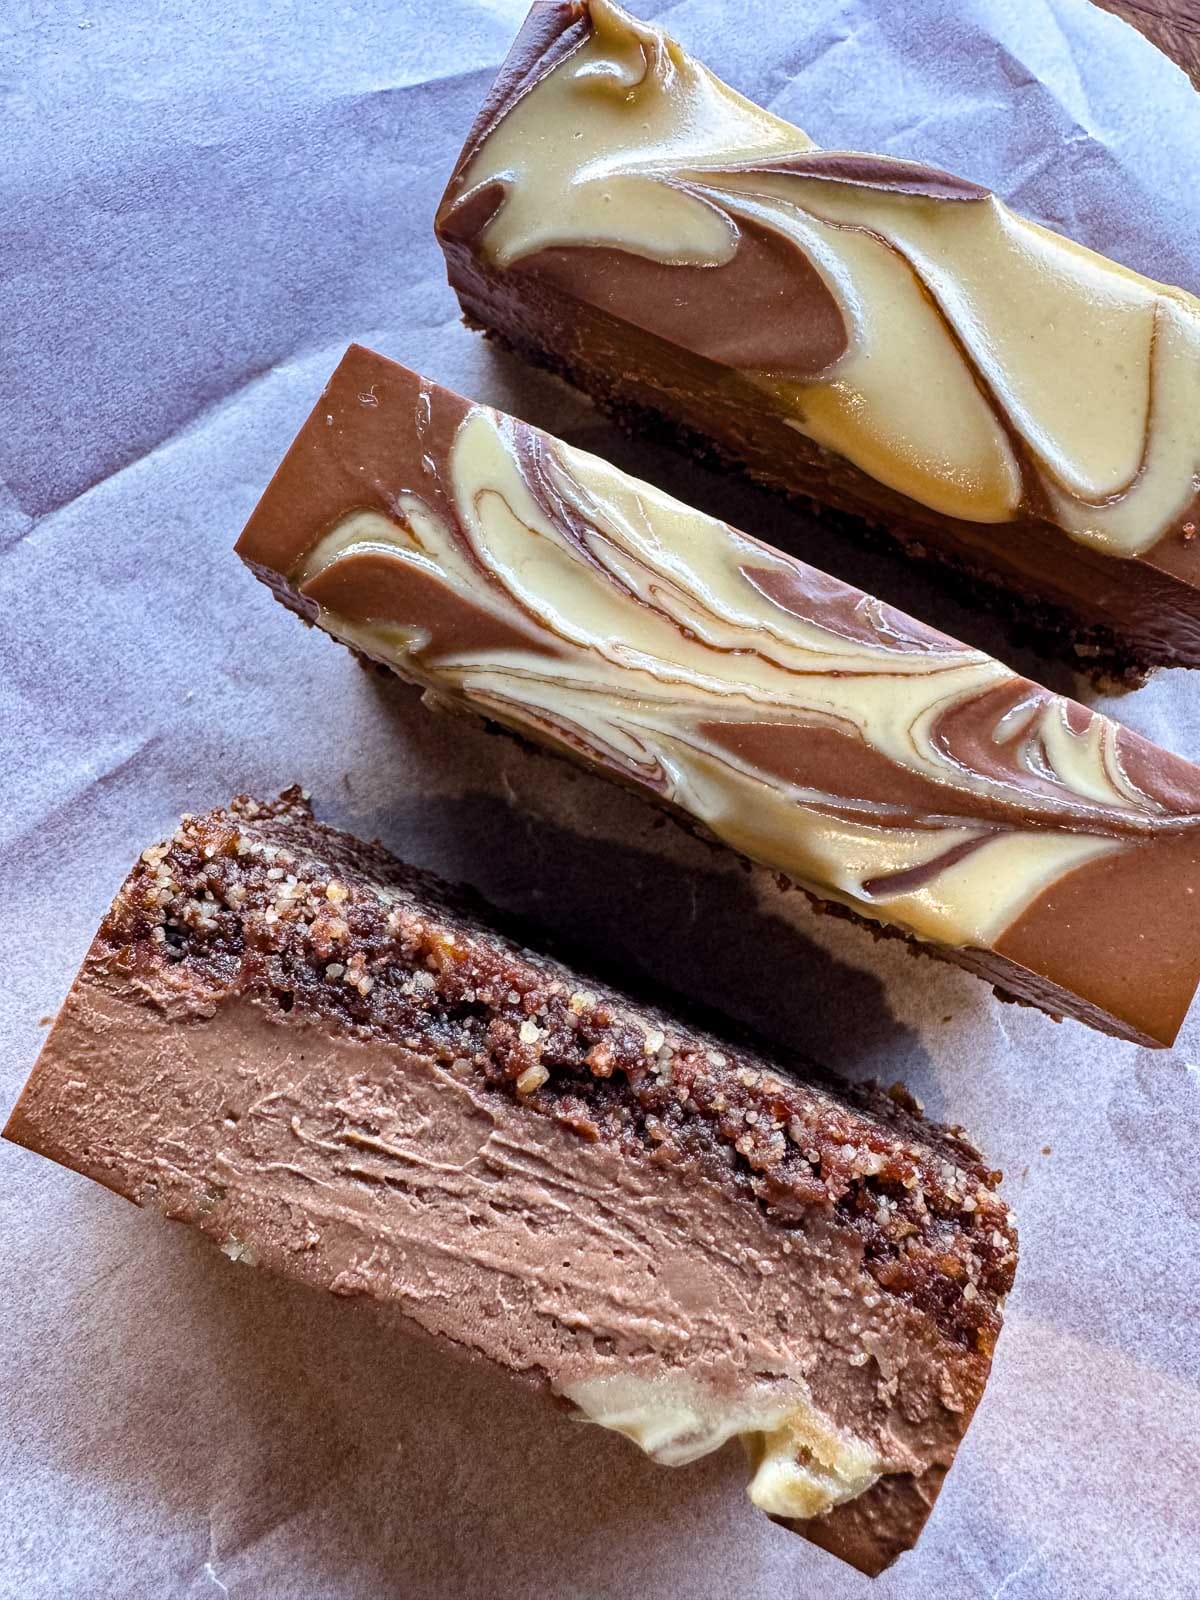
Step 5: Pour the chocolate mixture over the nutty base – it will settle into an even layer on its own. For an optional decorative touch, add small dollops of tahini on top.
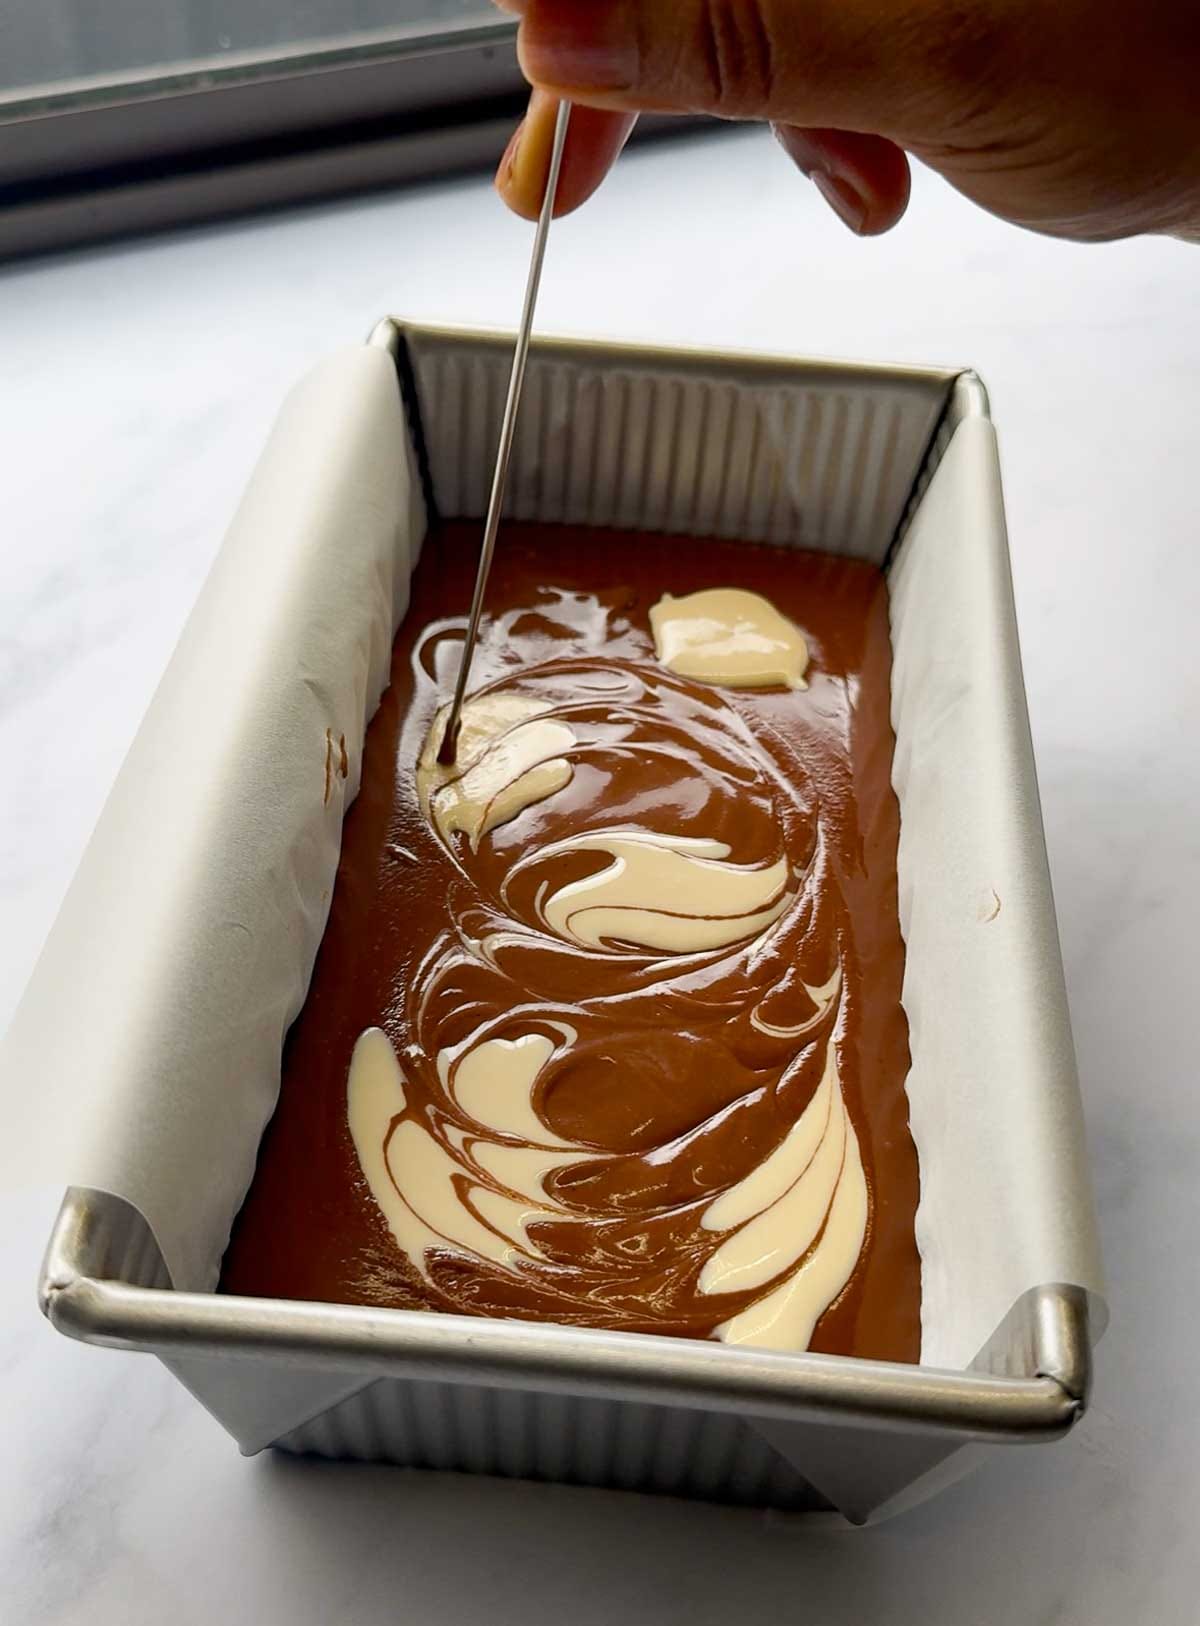
Step 6: Then use a skewer to swirl the tahini into a pretty pattern. Refrigerate for 3-4 hours to set. Remove from mould, slice and enjoy!
Tips for Perfect Healthy Chocolate Mousse Bars
TIP 1: SOFTEN YOUR DATES: use soft Medjool dates for easy blending. If they’ve been in the fridge, microwave them in 10–15 seconds bursts or soak in warm water for 5-10 minutes to soften;
TIP 2: BLEND DRY INGREDIENTS FIRST: when making the base, always pulse the nuts and dry ingredients before adding dates. This prevents clumping and ensures the base mixes evenly!;
TIP 3: TIGHTLY PACK THE BASE: press the mixture firmly into the pan to create a compact, even layer. This helps the bars hold their shape when sliced.
PRO TIP – CHILL BEFORE SLICING!
Refrigerate a minimum of 3 hours (or until fully set).
For clean cuts, use a sharp knife warmed under hot water and wiped dry between slices.
Common Questions Answered!
Why Is My Base Too Crumbly, and How Do I Fix it?
Pulse the dry ingredients first- then add the dates. This helps everything blend evenly and gives you a sticky, crumbly mix that holds when pressed. To check, squeeze a handful in your palm – it should stick together. When transferring to the pan, use a spoon, spatula, or clean hands to firmly press and tightly pack the base into an even layer. This helps the bars hold their shape and makes slicing much easier later.
What’s The Best Chocolate to Use for Vegan Mousse Bars?
A good-quality dark chocolate gives the mousse that smooth, silky finish. My go-to is Callebaut 811 – it’s rich, melts beautifully, and is often naturally dairy-free. You can also use other high-quality brands like Lindt, Ghirardelli, Guittards or Enjoy Life (which is vegan-certified). Just check the label to make sure there are no milk solids if you’re keeping it fully vegan. And of course, go with a chocolate you love – the flavor really shines through here!
Can I Decorate the Top of these Bars?
Absolutely! This is where you can get creative! Dollops of tahini swirled with a skewer give a beautiful marbled look and a subtle nutty flavor. You can also top with fresh fruit, chocolate shavings or crushed nuts. Try running crushed nuts along the sides and cutting the bars into triangles for a pie-like presentation. It’s totally up to you—have fun with it!
How Do I Slice These Bars Neatly?
Ensure it’s fully chilled and set, then remove from the mould before slicing. For clean, precise cuts, dip a sharp knife in hot water, wipe it dry, and slice in one smooth motion. Repeat as needed – this helps prevent the top layer from cracking and keeps the edges neat and defined.
How to Store Your Healthy Chocolate Mousse Bars
Storage: Store in the same pan you made them in and cover with plastic wrap; or transfer to an airtight container of your choice and refrigerate for upto 1 week.
Freeze Whole or Sliced: Freeze the entire slab in the pan or cut into bars for easy grab-and-go treats. Separate layers with parchment and freeze for up to 2 months. Let sit at room temperature for 10–15 minutes before serving, it softens slightly but still holds its shape.
Your Questions Answered!
Yes! These bars are made with wholesome, nutrient-rich ingredients like nuts, dates and tahini. They are also plant based vegan, dairy-free, gluten-free and refined sugar-free.
Absolutely! This recipe is completely no-bake, just blend, melt, pour and chill!
Keep them in an airtight container in the fridge for up to a week, or freeze for upto 2 months.
You can use cashew cream, oat cream or thickened almond/soy milk as dairy free alternatives.
More Dessert Recipes You’ll Love!
I hope you enjoyed these delicious Healthy Dark Chocolate Mousse Bars! If you gave it a try, please be sure to leave a comment and rating! I’d love to hear your thoughts!
Healthy Chocolate Mousse Bars
Equipment
- 1 Food Processor Small
- 1 Loaf Pan I used a 9" x 5" by USA PAN
Ingredients
For the Nutty Base
- 80 g Walnuts + Pecans mixed or single-type nuts, either works!
- 1 tsp Cocoa Powder I use Valrhona or Rodelle unsweetened
- 1 tbsp Almond Flour/Meal
- 2 tbsp Dessicated Coconut
- 115 g Pitted Medjool Dates 6-7 pieces (if cold, microwave in 10-15sec bursts OR soak in warm water 5-10mins)
For the Vegan Chocolate Mousse Topping
- 300 ml Coconut Milk I use the brand Kara
- 100 g Dark Chocolate Chips/Callets I use the brand Callebaut 811
- 1 tbsp Tahini (optional extra Tahini for swirling pattern on top)
- 1 tbsp Pure Maple Syrup
- 1 tsp Pure Vanilla Bean Paste or Vanilla Extract I use the brand Queens in Australia
- pinch Salt
Instructions
For the Nutty Base
- Line a 9"x5" loaf pan with parchment paper, leaving overhang for easy removal.
- In a small food processor, pulse pecans, walnuts, almond flour, cocoa powder, and desiccated coconut until the mixture resembles a coarse crumb.
- Next add the dates and pulse until chopped and evenly incorporated. The mixture should be a coarse crumb – no clumps, not mushy.
- Transfer the nut mixture to the lined loaf pan and press it firmly into an even, tightly packed layer. Use your hands, the back of a spoon, or anything flat to help pack it down evenly.
For the Vegan Chocolate Mousse Topping
- Add coconut milk, dark chocolate chips, tahini, maple syrup, vanilla, and a pinch of salt to a small saucepan.
- Heat over low to medium heat, stirring continuously until the chocolate is melted and the mixture is smooth and well combined.
- Remove from heat and let cool slightly.
- OPTIONAL: Spoon small dollops of tahini on top and use a skewer to gently swirl them into a marbled pattern.
Set & Serve
- Refrigerate for 3–4 hours, or until fully set and firm to the touch.
- Once set, lift from the pan using the parchment overhang, slice and enjoy!
Notes
- Pulse, don’t blend, you want a crumbly base, not a mushy one.
- Don’t forget to pit your dates, it’s an easy step to overlook, but important for your food processor!
- Add dates last, this prevents clumping and helps the mixture combine evenly.
- Run your knife under hot water and wipe dry before slicing, for clean, neat cuts.
Grab your Free copy
Low on Dinner Inspo? Let’s Fix That!
Sign Up Now and receive my Top 5 Easy Dinners eBook,with recipes ready in 30 minutes or less – absolutely FREE!
PLUS – Never Miss a Post!
Be the first to access fresh recipes and updates from Razia Cooks!


As soon as I saw this on instagram I had to make it! and oh-my-god, I am so glad I did! This dessert is soooooo good! and it’s healthy – I can’t stop eating it! Double batch next time for sure! thank you soooo much for sharing!
Wow, thank you so much! I’m so glad you made it — and that too, so quickly! It means the world to hear how much you enjoyed it! A double batch next time sounds like a great idea 😉 A 8″ square pan would work great for this! Really appreciate you taking the time to leave such a lovely comment! 🙂
The texture is silky, the flavours are perfectly balanced, and it feels like a dessert you’d get at a fancy café ….. except it’s made with wholesome ingredients. I kept double-checking the recipe because I couldn’t believe something this good could be this nutritious and so quick to make. These bars are definitely going into my regular rotation. Thanks for sharing this Razia !